
Yesterday, the monthly campaign meeting was taking place at our local hobby center, so me and Jesper figured we'd get a game in at the same time. I had challenged him earlier to an oil-match - a campaign connected game that only gives oil points (a form of credits); see full campaign rules here (.pdf) - and now we finally had a chance to face off.
Jesper's list is a monster. In a hobby center tournament a couple of weeks ago, he finished second with this list (I finished sixth), and only lost the top place because the time ran out. The list relies on speed and massed assaults rather than long range fire-power, and is ably backed up by loads of artillery and air power. In short, my prospects for winning didn't look good. My own list is very defensive and slow, so I was a tad worried that Jesper would concentrate on a part of my line and simply blast through it. I needed something to counter this, and I figured I'd try to trick him. Turns out I totally underestimated the speed his list was capable of.
The armies
I was using my standard defensive infantry-AT list, complete with artillery, some air and a few Shermans for heavy support:
1 Company HQ, 60 pts
2 Carbine team
2 Bazooka team
1 HQ Section
1 Rifle team
1 Bazooka team
2 Rifle Squad
3 Rifle team
1 Anti-tank Platoon, 90 pts
1 HQ Section
1 Carbine team
4 Gun Section
1 M3 37mm gun (Gun shield)1 Anti-tank Platoon, 100 pts
1 HQ Section
1 Carbine team3 Gun Section
1 M1 57mm gun (Gun shield; No HE)
1 Anti-aircraft Artillery Platoon, 105 pts
1 HQ Section
1 Carbine team
2 Automatic Weapons Section
2 M1 Bofors gun (Anti-aircraft; Turntable)
1 Field Artillery Battery, 165 pts
1 HQ Section1 Carbine team
1 Staff team
1 Observer Carbine team
1 Jeep
2 Gun Section
2 M2A1 105mm howitzer (Gun shield; Smoke)
1 Tank Platoon, 460 pts
4 M4, M4A1, or M4A3 Sherman
1 M3 75mm gun (Smoke)
1 .50 cal AA MG
1 Coax MG
1 Hull MG
1 Sporadic Air Support, 95 pts (P-40 Warhawk)
1 P-40 Warhawk
1 MG
1 Bombs
Total List Cost: 1405
Jesper's speedy list:
1 Company HQ, 185 pts
4 'Honey' Stuart I or III (Light Tank)
1 M5 37mm gun (No HE)
1 Co-ax MG
1 Hull MG (Hull Mounted)
4 'Honey' Stuart I or III (Light Tank)
1 M5 37mm gun (No HE)
1 Co-ax MG
1 Hull MG (Hull Mounted)
1 Light Armoured Platoon, 140 pts
3 'Honey' Stuart I or III (Light Tank)
1 M5 37mm gun (No HE)
1 Co-ax MG
1 Hull MG (Hull Mounted)
3 'Honey' Stuart I or III (Light Tank)
1 M5 37mm gun (No HE)
1 Co-ax MG
1 Hull MG (Hull Mounted)
1 Light Armoured Platoon, 140 pts
3 'Honey' Stuart I or III (Light Tank)
1 M5 37mm gun (No HE)
1 Co-ax MG
1 Hull MG (Hull Mounted)
3 'Honey' Stuart I or III (Light Tank)
1 M5 37mm gun (No HE)
1 Co-ax MG
1 Hull MG (Hull Mounted)
1 Royal Horse Artillery Battery, 480 pts
1 HQ Troop
1 'Honey' Stuart I or III (Light Tank)
1 M5 37mm gun (No HE)
1 Co-ax MG
1 Hull MG (Hull Mounted)
1 Staff team
2 HQ Section
1 Rifle team
1 Observer Rifle team
1 15 cwt truck
4 Gun Section
2 OQF 25 pdr gun (Gun shield; Smoke; Turntable)
1 Firing Bombardment (Smoke Bombardment)
1 HQ Troop
1 'Honey' Stuart I or III (Light Tank)
1 M5 37mm gun (No HE)
1 Co-ax MG
1 Hull MG (Hull Mounted)
1 Staff team
2 HQ Section
1 Rifle team
1 Observer Rifle team
1 15 cwt truck
4 Gun Section
2 OQF 25 pdr gun (Gun shield; Smoke; Turntable)
1 Firing Bombardment (Smoke Bombardment)
1 Scout Platoon, 135 pts
1 Scout Patrol (Reconnaissance Platoon)
3 Universal Carrier
1 Hull .50 cal MG (Hull Mounted)
1 Hull MG (Hull Mounted)
1 Scout Patrol (Reconnaissance Platoon)
3 Universal Carrier
1 Hull .50 cal MG (Hull Mounted)
1 Hull MG (Hull Mounted)
1 Heavy Armored Car Platoon, 210 pts (Reconnaissance Platoon)
3 Boarhound I
3 Boarhound I
1 Co-ax MG
1 Hull MG (Hull Mounted)
1 OQF 6 pdr gun (No HE)
1 OQF 6 pdr gun (No HE)
1 Limited Air Support, 135 pts
1 Hurricane IID
1 Cannon
1 Hurricane IID
1 Cannon
Total List Cost: 1425
My plan and deployment
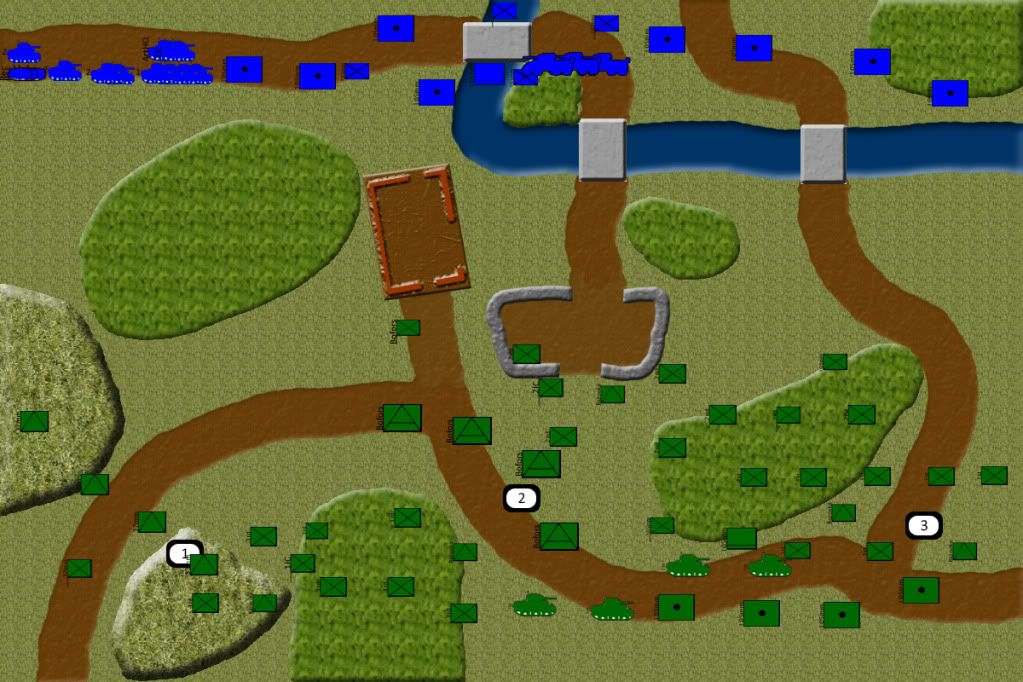
Looking at the battlefield and the way the objectives were positioned, I decided to attempt a version of the "Refused Flank" tactic, where I appear strong on one flank prompting my opponent to attack the other. Given the rules of the scenario, I knew I had to start withdrawing platoons at turn 3, and I didn't want to have to withdraw a platoon in the face of the enemy. Drawing from experience, I knew that my Rifle Platoons would be severely beat up when faced with the many MGs of the light tanks, and I also knew that Jesper didn't want to attack head long into a wall of infantry backed up by heavy guns. Therfore, I opted to deploy two strong infantry platoons covering the right and center objectives, backed up by artillery to the right and AAA guns in the center. I deployed the third infantry platoon slightly left of the center objective, stretched towards the left, placing only 37mm AT guns on the left-most objective. I wanted Jesper to sneak around the woods on my left flank, across the hill and go for the left-most objective. I had a 57mm AT gun platoon in reserve, and my Shermans weren't far away, so I felt confident I could hold him there and decimate his platoons. I was worried about the capabilities of his artillery, as he had a full 8-gun battery which gives him some nasty special rules when firing both at the same target. Because of this, I spread out my teams as much as possible, trying to ensure that any single artillery-template wouldn't hit more than one, or a maximum of two teams.
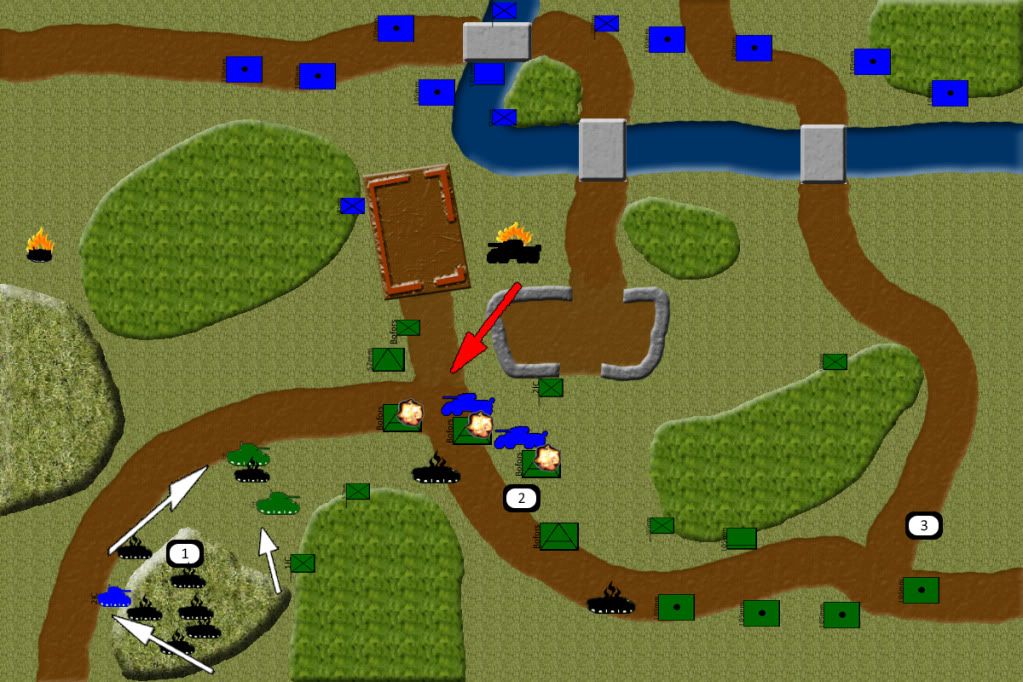
As I had expected, Jesper deployed his entire Stuart force on my left, aimed at the small gap between the woods and the edge of the table. The Boar deployed in the center, looking like they were about to enter the small piece of wood there. The artillery was spread out in the rear, looking terribly intimidating. The HQ Stuart of the artillery platoon was deployed with the other tanks, and the recce element of 3 Universal Carriers armed with .50-cal machine guns deployed in front of the tanks. I was facing 11 Stuarts and 3 Universal Carriers on an extremely overloaded flank. This looked like it would get ugly.
Turn 1
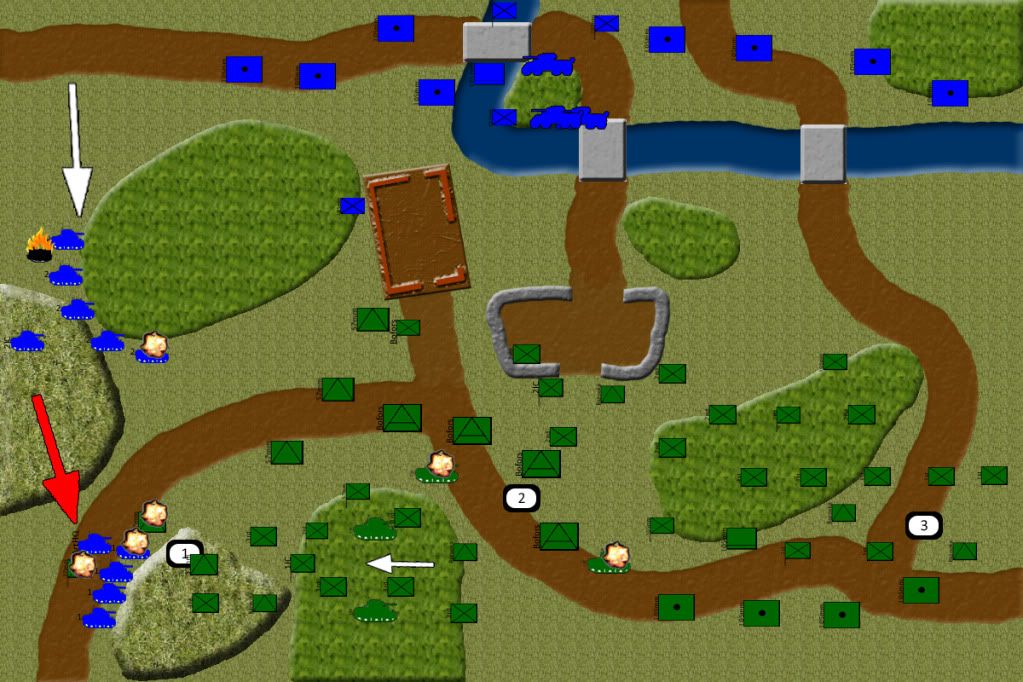
The British recce and Stuarts advanced up the left flank, wildly exceeding the speed I had estimated. There were within centimeters from being able to launch a turn 1 assault. The Boarhounds trudged into the forest in front of them, one of the cars bogging down in the rough terrain. The two spotters advanced to more advantageous spots from which to have a nice view of the entirety of the American lines. Three Royal Airforce Hurricane II D showed up, targeting the righ-most Sherman, looking to fire their cannons at everything that moved. Smoke canisters were fired from half the British artillery battery, raining down in my center and obstructing the view for two of the Bofors ack-ack guns. Simultaneously on the left flank, the second half of the battery opened fire on the 37mm AT guns, spotting them on their own, but failing to hit the target. The front Stuarts opened up on the same target with their machine guns, but the gun-pits deflected the shots. The Boarhounds tried to shoot the two unobscured Bofors guns, hit twice but had their shots deflected as well. So far it was looking pretty good for me. Then the .50-cals of the recce element opened up on the 37mm guns. Two hits were scored, two gun saves were failed, and two 5+ firepower rolls were made. Two guns bit the dust. Finally, the two unobscured Bofors guns opened up on the Hurricanes, blowing all three of them out of the sky.
In response to the extremely rapid British advance on my left, the Shermans cranked up their engines and started snaking around the woods on my center-left, headed towards the sea of Stuarts. An ambushing line of 57mm AT guns were revealed covering the open ground between the building and the hill in my deployment zone. Everything else remained in their gun-pits. The 105mm artillery battery opened up my shooting, ranging in on the Boarhounds with a Time On Target bombardment, but failed to score any hits. The two surviving 37mm AT guns poured shots into the British Universal Carriers, scoring three penetrating hits which bailed 2 and killed the last outright. The 57mm guns opened up on the same target, bailing the two remaining carriers once again, prompting them to fail their moral check and going home. I sat back and braced myself for the coming assault.

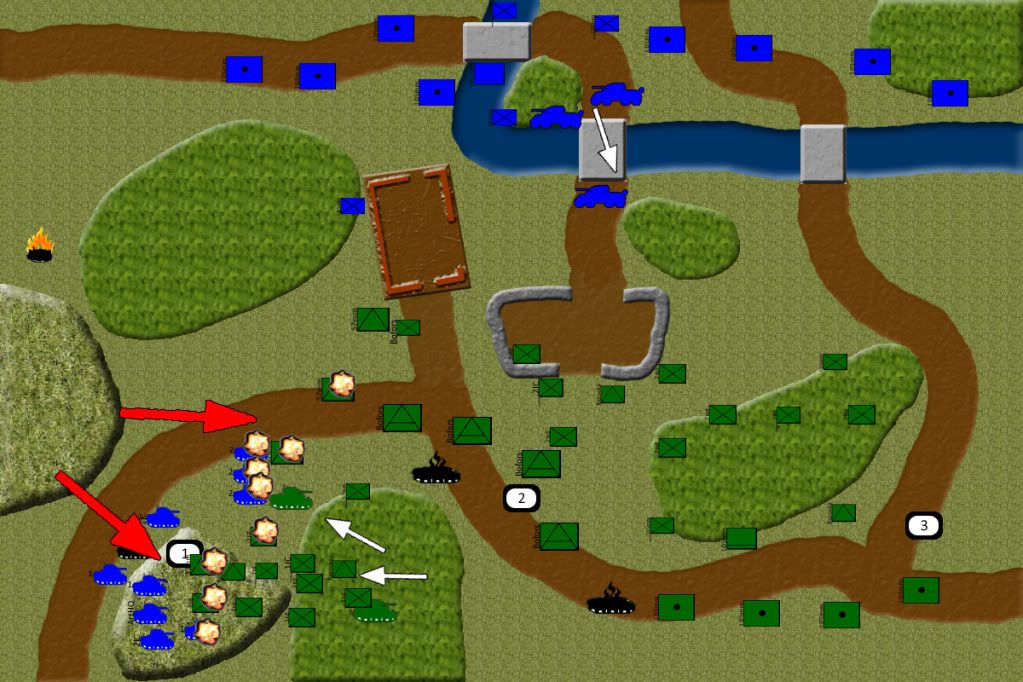
Turn 2
Two more Hurricanes showed up, aiming at the Shermans once again, the brave British pilots apparently unfazed by the fate of the pilots in the last turn. The front Stuart platoon move up together with the Fearless Veteran artillery battery commander and the 2IC, to get into assault range of my 37mm AT guns. The rear-most Stuart platoon, with the company commander to the rear, move around the woods, closing in on the 57mm AT guns. The bogged down Boarhound must have blown a tire, as he's stuck for another turn, and the last spotter gets in place to start raining down artillery fire in case the battery can't spot for themselves. The Boarhounds open up the shooting phase, training their 75mm guns on the Shermans. They score two hits, one of which is saved. The other shot penetrates the armor of the lead Sherman and a terrible explosion kill everyone inside. The rear-most Stuart platoon open up with MGs on the Bofors guns but can't score a direct hit. The gunners duck and cover, safe from the bullets whistling above, but unable to operate their guns with any efficiency. Half of the artillery battery tries to range in on the Bofors guns, but can't find the proper elevation, while the other half does the same and manages to hit and pin the 57mm guns, the AT crew cowering in their gun pits. Finally, the front Stuart platoon together with the two independent tanks open fire on the last two 37mm AT guns and their commander, scoring lots of hits and pinning the platoon. Two pinned Bofors ack-ack open up on the Hurricanes aiming for the Shermans. One of the two planes is shot down, but the last one presses home the attack, hitting the rear-most two tanks, causing one to explode and the other to bail out. The Stuarts launches an assault on the 37mm. the AT guns managing to get a couple of shots of, bailing the Stuart 2IC. The rest of the tanks hit home, killing a gun team and the platoon commander, but the final gun refuses to budge.
Being down two Shermans, the remaining to duck into the woods to be out of sight for the Boarhounds and artillery, and within striking distance from objective 1. The movement phase thus concluded, shooting commences. The pinned AT platoons both open up on the encroaching tanks, managing to bail the artillery commander, but not much else. The now un-pinned Bofors guns that didn't shoot ack-ack attempt to fire at the same targets, only being able to hit the bailed out tank. The Stuart is again bailed and fails its moral check, fleeing the table. Finally, the 105's range in with a TOT bombardment on the cluster of Stuarts behind the leftmost hill, hitting several tanks and destroying one of them and bailing another. The Stuarts now contest objective 1, which is still held by the last surviving 37mm AT gun and a single rifle team.
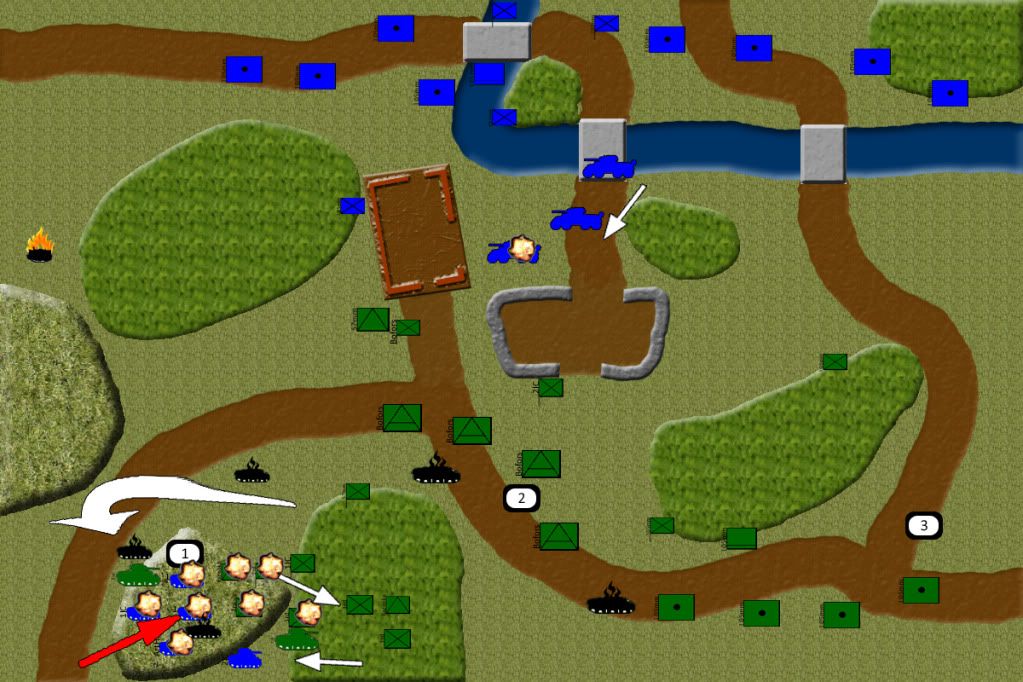
Turn 3
The Royal Airforce seems to have had enough of the heavy anti-aifcraft fire and decides not to show up. They have been much more effective than the US Air Force thus far, so nobody blames them. The Boarhounds move out of the woods, over the bridge towards the American lines. Both Stuart platoons shuffle forward, getting in position to assault the infantry team and AT gun holding the objective, as well as the 57mm AT guns. The Boarhounds attempt to dig out the Bofors with heavy fire, failing to score any hits. Both artillery platoons then conduct separate bombardments on the same target, managing to pin both the AAA guns and the 57mm AT guns. It looks like the 57mm's are going to have a rough time in the coming assault. The Stuarts blast away with their MGs, killing the objective claiming infantry team, and then conducts assaults first on the 37mm AT - destroying the last gun after having a tank knocked out by defensive fire - and then on the 57mm AT - suffering another dead Stuart and two destroyed AT guns. The American AT fire is going to be considerably cut in the next turn. Thank the maker for the Bofors guns!
It's time to withdraw a platoon, so the rightmost infantry retreats off the table in an ordered fashion. To make matters worse for the US forces, one of the two remaining Shermans decide it's had enough driving around in the forest and promptly hits a large rock, bogging the tank down (Jesper referred to this as an 'epic bog'). The Sherman platoon commander safely exits the forest and drives up so that he's barrel to barrel with a Stuart. The infantry platoon to the left rushes towards the objective in hopes of surviving the inevitable assault in the next turn. Fire is concentrated on the Stuarts, the bazooka team attached to the rifle platoon managing to bail the Stuart 2IC. The Sherman with his gun barrel more or less adjascent to a Stuart misses the barn-door-shot, and the 57mm AT doesn't fare any better. Once again, it comes down to the Bofors guns, pouring fire into the two closest Stuarts, bailing them both which causes the crews to gun it off the table.The valiant AAA guns also manage to bail one of the approaching Boarhounds. Artillery rounds rain down in the same spot as last turn, bailing yet another Stuart. Lots of hits, but poor firepower rolls.
Turn 4
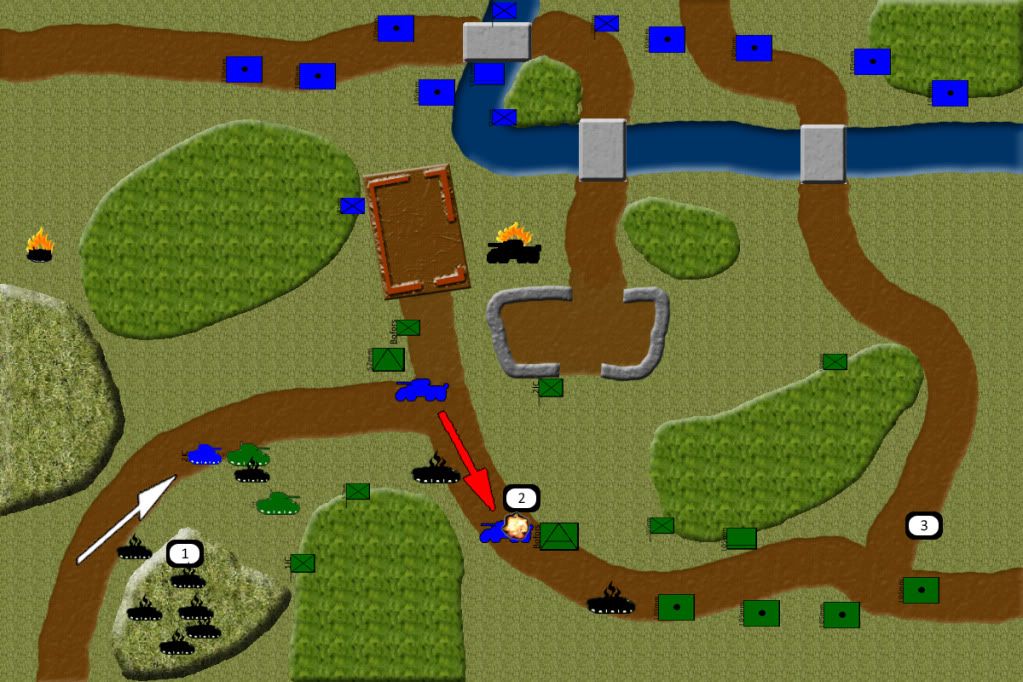
With one of the Stuart platoons gone, the independent Stuarts join up with the surviving platoon to form a five-tank assault force. They move around the South of the hill, maneuvering into position to be able to assault the infantry without drawing defensive fire from the Sherman beyond. The Boarhounds roll forwards, lining up a shot on that same Sherman's side armor with their powerful AT 10 guns. Firing, they hit the American tank once. As the shot was from long range, the Sherman armor counts as 5, and a 6 is rolled as a save, making the shell bounce harmlessly off the side of the tank. Half the artillery bombards the Bofors but miss with all shots, and the other half ranges in on the US company commander, hitting three teams and pinning the infantry platoon that is about to be assaulted. As it turns out, pinning that platoon was redundant, as the Stuarts trounces them with machine gun fire, killing four teams outright. The riflemen find their courage and stay on the field of battle, and the Stuarts occupies the vacated positions.
The center infantry platoon withdraws in good order. The bogged-down Sherman manages to circle the rock and reach the edge of the forest, mere meters away from the rampaging Stuarts. The Sherman platoon commander circles around the hill to get away from the Boarhound fire, keeping the Stuarts in his sights at all times. The three surviving teams from the left-most infantry platoon withdraws into the forest, using the company commander to give directions as their own platoon commander got killed. The artillery opens up on the Boarhounds who are getting perilously close to the center objective (which I can't remove in turn 6, as I placed it), but misses the gigantic armored cars. The Bofors guns once again shows how it's done and kills one Boarhound, making their tally thus far 1 Stuart and 1 Boarhound killed, 3 bailed and 4 planes shot down. The Shermans and the 57mm AT pours heavy shells into the Stuarts, killing four outright and bailing the last one. The sole survivor - the company 2IC - manages to pass his moral check, but the British assault on the left flank is irreparably broken up.
Turn 5
The last surviving Stuart gets back into his vehicle and drives to position his gun barrel in the exhaust pipe of the Sherman platoon commander. The Boarhounds creep up on the Bofors guns, firing as they go. The artillery joins in, firing smoke and shells on the AAA, destroying one of the guns and masking the rest in a thick blanket of smoke. The plucky Stuart fires and the shell thuds into the rear armor of the Sherman platoon commander, making the crew take cover in the bottom of the tank. The Boarhounds are now the one's who must clutch this for the Brits, and they assault the pinned down Bofors guns, who, true to form, hits and bails one of the armored cars. The other one destroys the AAA gun, and ends up close enough to scare the crew off of a third immobile gun, winning the assault and contesting the center objective, still held by the last Bofors gun.
The decimated infantry in the woods make a tactical withdrawal in good order. The Sherman platoon commander decides that the Stuart shot was probably just the wind and gets his crew back in position, gunning the engine towards the Boarhounds, the second Sherman joining in. The 105 battery fails to locate the sneaky armored cars and fails to fire. Both the sole surviving 57mm AT gun and the Shermans fire all their shots into the bailed Boarhound, but doesn't manage to hit it. The coming assault on the last Bofors gun - who managed to survive the moral check and un-pin - will decide the game.
Turn 6
Nothing much to do for the Brits. The last Stuart once again finds the exhaust pipe of the Sherman platoon commander, and the un-bailed Boarhound gets in position for the final assault, his companion refusing to resume control of his vehicle. Smoke from the artillery conceals the Bofors gun and the Boarhound. This will be a duel to the death! The rest of the british shooting - an artillery troop and the Stuart - concentrate on the Shermans, the Stuart once more managing to bail the tank. The Boarhound fires on the AAA but scores only two hits, failing to pin the gun. The assault proceeds nevertheless, but withering defensive fire makes the crew of the armored car take cover in the rear of the vehicle. The American gunners senses victory and passes their counter attack check, claiming the Boarhound as a trophy. With that, the Brits senses that all is lost and the commander - Jesper - conceeds defeat with a stretched out hand.
The result and my thoughts
The match ended as a 5-2 victory to the Americans, but that doesn't really reflect how close this game was, or how I managed to make several crucial platoon moral checks in the closing turns. Jesper's dice rolling wasn't bad, but my luck was were it counted today, and that's what gave me the victory.
My plan worked perfectly. Jesper did exactly what I wanted him to do. The problem was that I severely underestimated the sheer velocity his wee tanks could acheive. I had anticipated being assaulted on turn 3, but it came already in turn 2, almost catching me napping. I also hadn't anticipated the accurate and deadly fire from the Boarhounds, nor that a single British aircraft could be so deadly. Despite all this I prevailed, and together with luck, I'd say sticking to my original plan was what clutched it for me.
I find it not a little ironic that the day after I decide to give up on Bofors guns and adopt a mobile anti-aircraft philosophy, the Swedish made guns showed true brilliance, even managing to ultimately deliver the killing blow to the British. If I were to select a man of the match, that honor would with no hesitation go to them. My Shermans also had a good game, after being almost broken in turn 2. They saved my bacon on the left flank, together with the 57mm AT gun. My AT guns proved extremely difficult to get rid of, making their platoon moral checks with gusto, and the delaying infantry to the left did their part as well. Even the artillery, which I normally haven't had much luck with, had their moments of glory, killing and bailing tanks. The two infantry platoons on the right did their job as well, which was to keep still and out of trouble, and then to withdraw orderly. Job well done, men!
When it comes to Jesper's command of his forces, I can't fault him. He plays his list very well, and if I had bee in his shoes, I wouldn't have changed anything he did, with the possible exception of once in a while taking advantage of the fact that he had an eight-gun battery, if for no other reason than that it's extremely cool. We both agreed that it was a good and close game, and I think we even managed to keep the interest of our weathered game judge, who stayed way longer than anyone expected him to, seeing the game to a finish. Thanks for that, Staffan.
Jesper, if you want to do your own summary, just send me a text file and I'll update.
Have a good one, everybody.
Until next time,
Fredrik
Fredrik
*UPDATE* Some pictures from the game:
 |  |  |  |
Inga kommentarer:
Skicka en kommentar