
As part of an ongoing campaign at our local hobby center, me and Jonas were going to face off at the 1300 point level. First, a quick rundown on how the campaign works:
Each player gets to challenge another player. A win gives 4-6 points, depending on how solid the victory was. A loss gives 2 points, and a draw 3 points. The points are spent during a campaign meeting each month, allowing you to claim territory, build ships, factories and other things to help your side claim the overall victory. You also get to chose a strategy each month that applies to your campaign battles.
Jonas had challenged me, so battle had to follow. My army was already finished, but Jonas had to cram in some late painting sessions to be able to field his Berzaglieri, and even so, one of his platoons weren't even based yet. Moral victory to me! I went for my standard list with a slight alteration; the 57mm AT guns were replaced with a heavy machine gun platoon, and the 40mm Bofors ack-ack were traded for a two-section 81mm mortar platoon, as I knew I'd be facing a bunch of infantry. Jonas' Bersaglieri list was basically him cramming in all his infantery; two full Berzaglieri platoons with all the bells and whistles, a mortar platoon as artillery and some Carri and AT. Both lists were at 1420 points, so we were equally heavy. As per the campagin rules, we were able to add on an extra 10% to the points level, so we were close to the limit.
A few notes: This battle report isn't a complete and accurate representation of the game, nor does it aspire to be. It is as close as I can remember the game, but there are bound to be things omitted due to insignificance, or things I simply forgot about. The battle maps do not include the Italian mortar platoon as they had absolutely no impact on the game.
Starting Step and Deployment
Jonas' army list:
Italian Battaglione Bersaglieri List
1 Battalion HQ, 35 pts (Immobile Division; Passaglia Bombs)
2 Rifle team
1 Bersaglieri Company, 280 pts
1 HQ Section
1 Rifle/MG team (Passaglia Bombs)
2 Bersaglieri Group
2 Rifle/MG team (Passaglia Bombs)
1 Mod 37 HMG
1 47/32 gun
1 20/65 gun (Anti-aircraft; Turntable)
1 Bersaglieri Company, 365 pts
1 HQ Section
1 Rifle/MG team (Passaglia Bombs)
1 Bersaglieri Group
2 Rifle/MG team (Passaglia Bombs)
1 Mod 37 HMG
1 47/32 gun
2 Bersaglieri Group
2 Rifle/MG team (Passaglia Bombs)
1 Mod 37 HMG
1 47/32 gun
1 Solothurn anti-tank rifle
1 Heavy Anti-aircraft Platoon, 220 pts
2 Gun Section
1 Lancia da 90/53 (Awkward Layout; Overloaded; Slow Tank; Stabiliser Jacks)
1 90/53 gun (Heavy Anti-aircraft)
1 Bersaglieri Mortar Platoon, 100 pts
1 HQ Section
1 Rifle team
1 Observer Rifle team
3 Mortar Section
1 81/14 mortar (Smoke Bombardment)
1 Carri Platoon, 325 pts
5 M14/41 (Improvised Armour)
1 47/32 gun
1 Co-ax MG
1 Twin hull MG (Hull Mounted)
1 Armoured Car Platoon, 95 pts (Reconnaissance Platoon)
3 AB41
1 20/65 gun
1 Co-ax MG
1 Hull-rear MG (Hull Mounted)
Total List Cost: 1420
My army list:
US Rifle Company List
1 Company HQ, 60 pts
2 Carbine team
2 Bazooka team
1 Rifle Platoon, 110 pts
1 HQ Section
1 Rifle team
1 Bazooka team
2 Rifle Squad
3 Rifle team
1 Rifle Platoon, 110 pts
1 HQ Section
1 Rifle team
1 Bazooka team
2 Rifle Squad
3 Rifle team
1 Rifle Platoon, 110 pts
1 HQ Section
1 Rifle team
1 Bazooka team
2 Rifle Squad
3 Rifle team
1 Anti-tank Platoon, 90 pts
1 HQ Section
1 Carbine team
4 Gun Section
1 M3 37mm gun (Gun shield)
1 Field Artillery Battery, 165 pts
1 HQ Section
1 Carbine team
1 Staff team
1 Observer Carbine team
1 Jeep
2 Gun Section
2 M2A1 105mm howitzer (Gun shield; Smoke)
1 Firing Bombardment (Smoke Bombardment)
1 Mortar Platoon, 85 pts
1 HQ Section
1 Carbine team
2 Mortar Section
2 M1 81mm mortar (Smoke Bombardment)
1 Machine-gun Platoon, 100 pts
1 HQ Section
1 Carbine team
2 Machine-gun Section
2 M1917 HMG
1 Tank Platoon, 460 pts
4 M4, M4A1, or M4A3 Sherman
1 M3 75mm gun (Smoke)
1 .50 cal AA MG
1 Coax MG
1 Hull MG
1 Limited Air Support, 130 pts (P-40 Warhawk)
1 P-40 Warhawk
1 MG
1 Bombs
Total List Cost: 1420
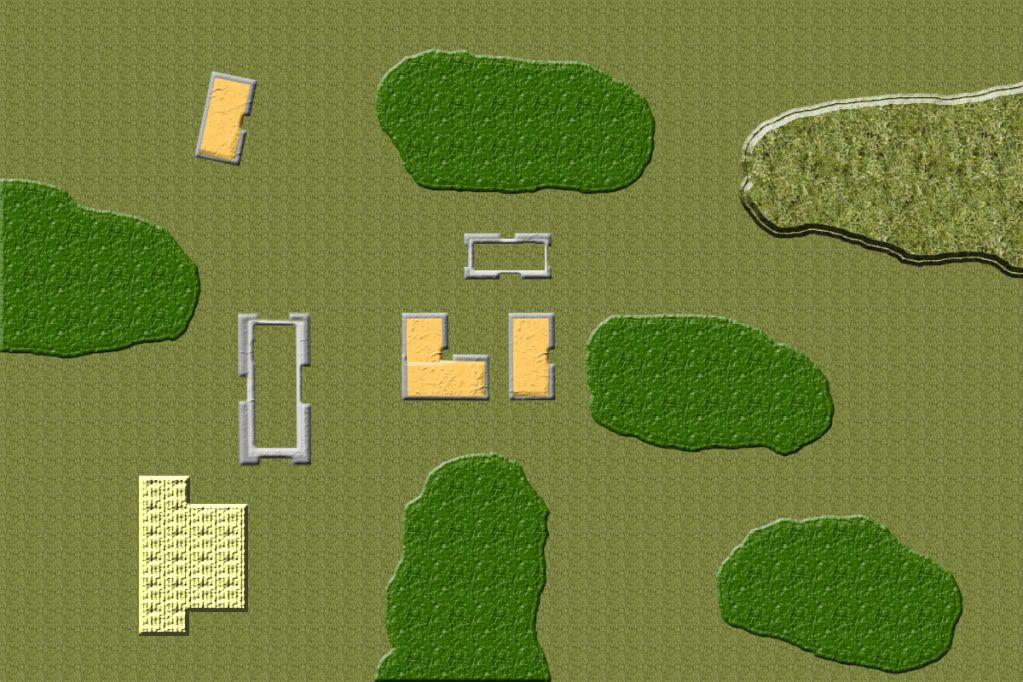 |
| Battlefield |
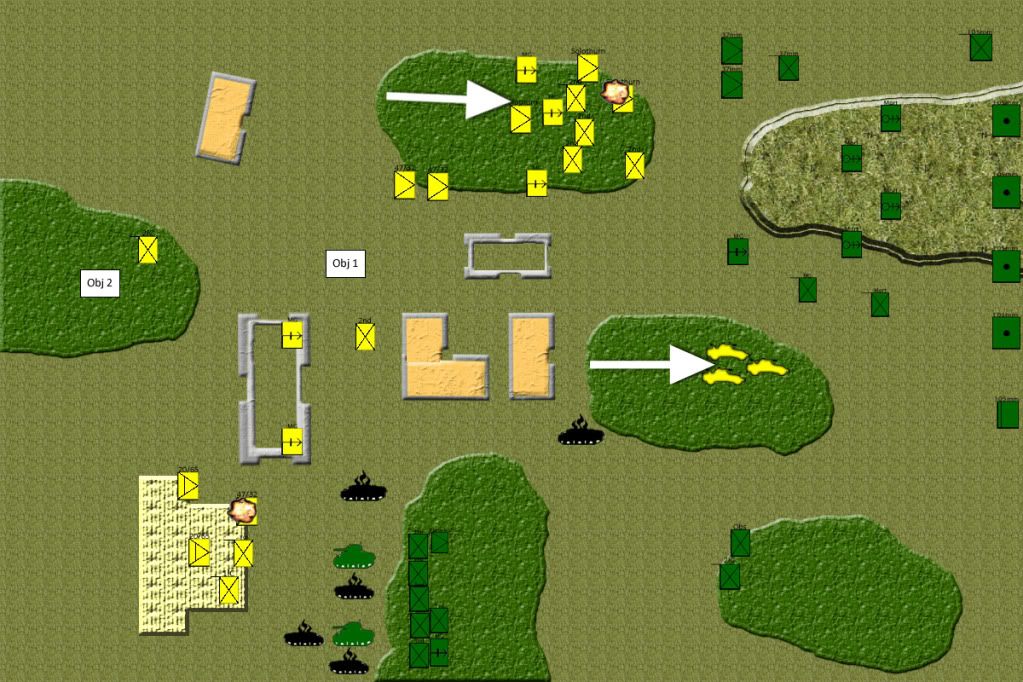
The battlefield was a 6 by 4 setup with woods scattered about and a few houses in the center and left side. A hill dominated the right side. We rolled up the mission "No Retreat" which meant we were playing a Defensive Battle. Because of the Berzaglieri special rule, Jonas was the defender and I had to attack. I really hate attacking with infantry, as I have no transports and a lot of slow and bulky teams. However, the terrain looked like it favored infantry sneaking through the woods for an all out assault claiming the objectives, so I had hopes for claiming the victory.
Because Jonas had selected a strategy called Careful Planning, I had to deploy my entire force and surrender the first turn to him, despite the scenario rules claiming the opposite. Because of this, I took great pains to ensure he couldn't pick my guys off on his first turn. The other problem with this was that his reserves would be coming in sooner than anticipated, so time was of the essence. I therefore deployed my forces with a turn 3 assault in mind. My strategy was Hardened Veterans which allowed me to select two platoons and either give them an extra skill level or an extra motivation level. I opted to make my artillery and tank platoons into veterans.
Jonas deployed his two full Berzaglieri platoons covering the entire line. Because we were playing across the long edge of the board, he had less territory to cover, and since all his troops were entrenched, his defence looked pretty solid already, and that was with three platoons off the table and one in Ambush. I hoped that a strong push on the southern (my left) flank would break through and allow me to claim the furthest objective.
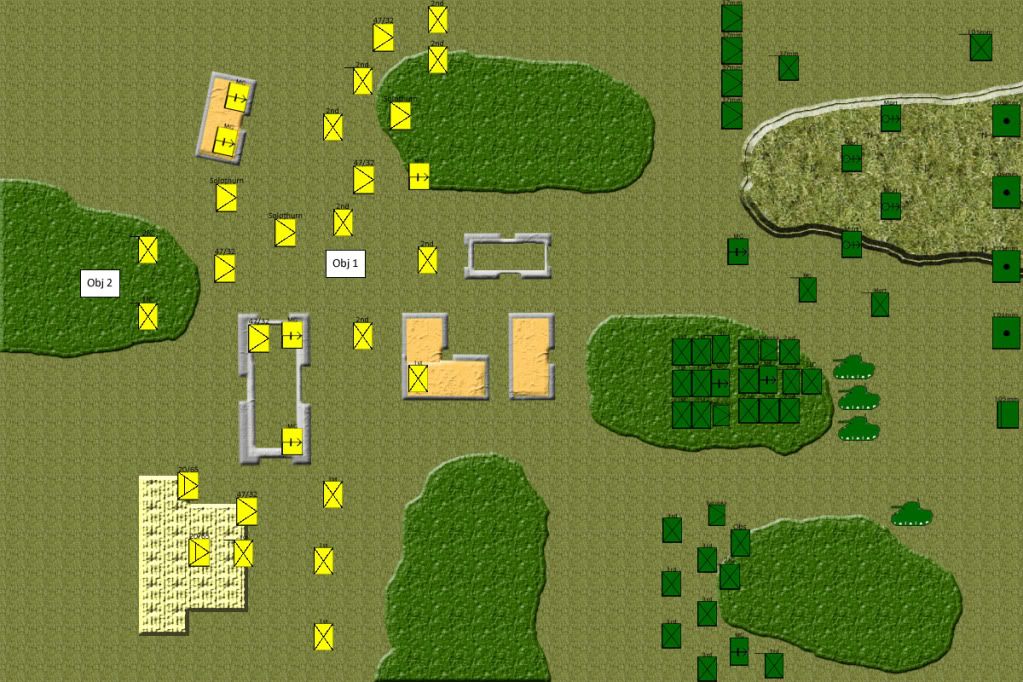
Deployment
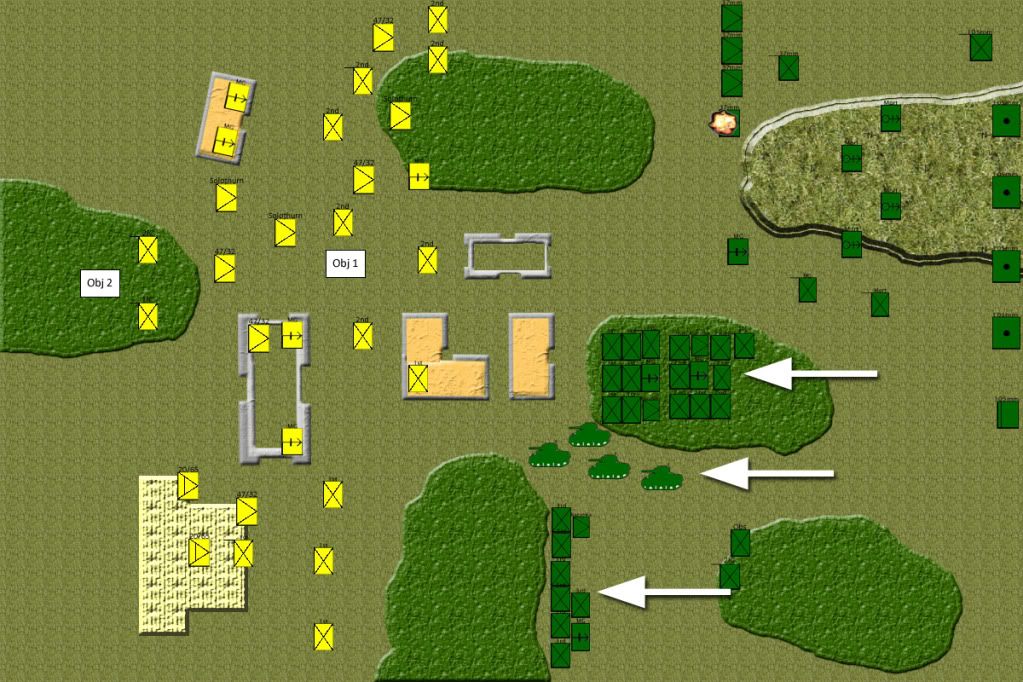
Turns 1-2
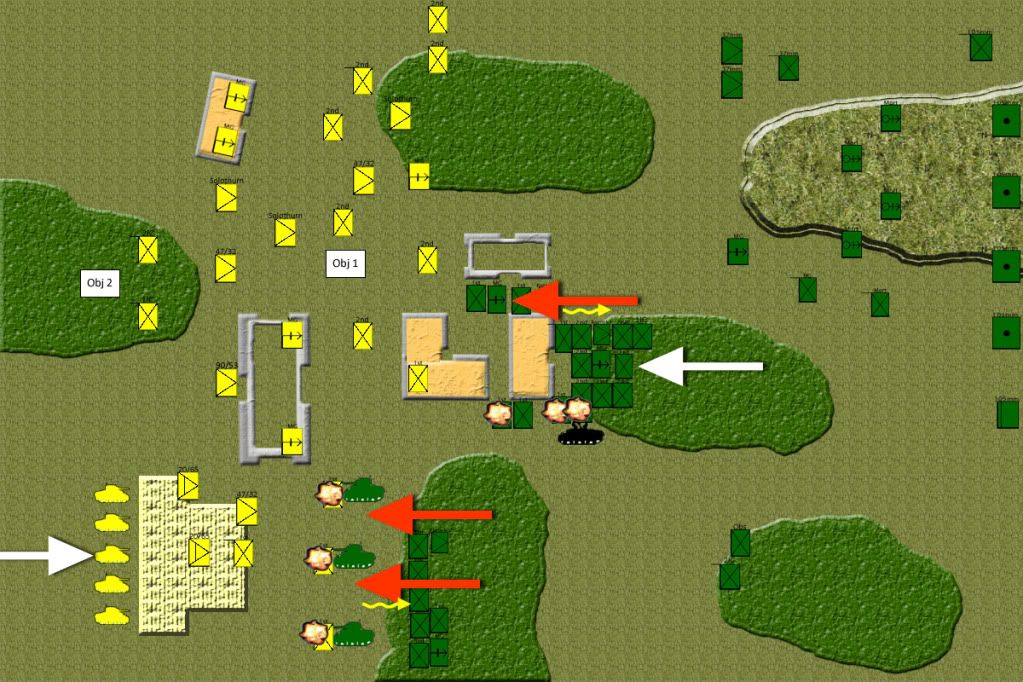
Jonas kicked off the game doing not much of anything. He sniped one of my AT guns with one of his own, but as he had no artillery and nothing else in range, his turn was quick and easy. I moved all my guys up towards the enemy, the right flank infantry moving at the double to be able to enter the woods in the next turn. My tanks moved up to threaten his entrenched infantry while my artillery started trying to range in on whatever they could see to little effect. I was reinforced by two P-40 Warhawks, trying to bomb a couple of AT guns in the center near the closest objective, but these were both shot down by Italian ack-ack.
Turn 1
 |
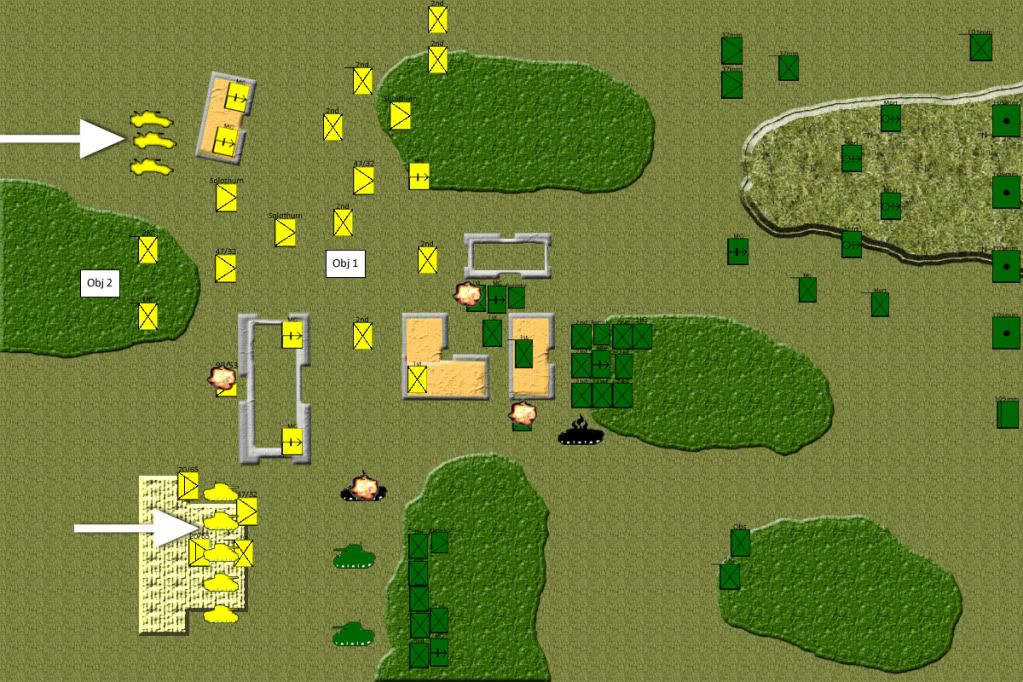
Turn2 |
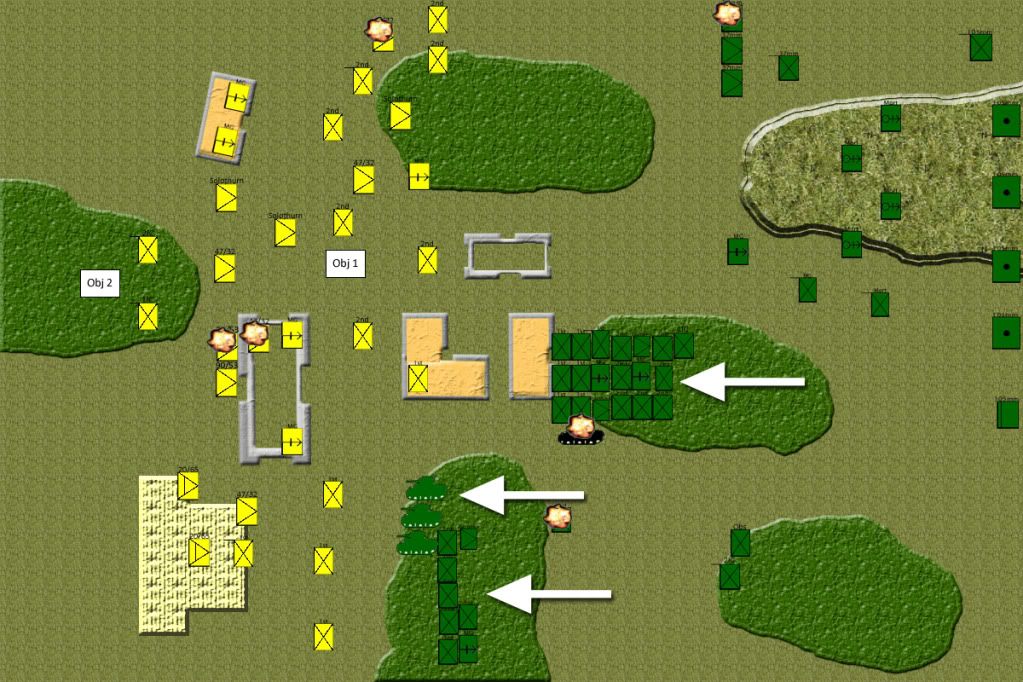
In his second turn, Jonas sprung his ambush, positioning his Lancia 90/53s in a concealed position behind some rubble to the rear of his southern Berzaglieri company. He fired on my Shermans, blowing one up and bailing another. At the same time, the infantry team he had positioned in the middle buildings shot at my infantry platoon that had gone At The Double, causing him to be able to fire at twice his ROF, causing one casualty, and the AT gun to the north sniped another of my 37mm. The US infantry then pushed up further, entering the southern forest and taking refuge behind the buildings in the center for the assault that was coming next turn. My artillery bombarded the Lancias, destroying one and bailing the other as well as taking out a 47/32 AT gun, giving my Shermans some respite to bail in the one tank and move up to be prepared to support the infantry. Meanwhile, a solitary P-40 and my mortars joined their fire and blew up the AT gun that was sniping my own 37mms to the north.
Turn 3
 |
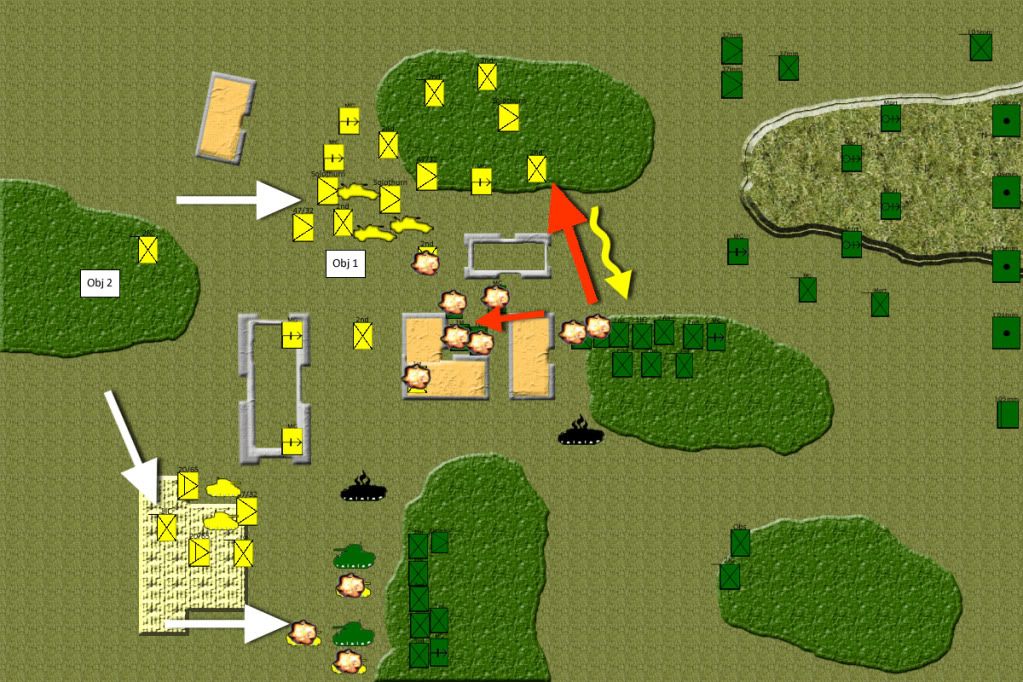
| Turn 3 |
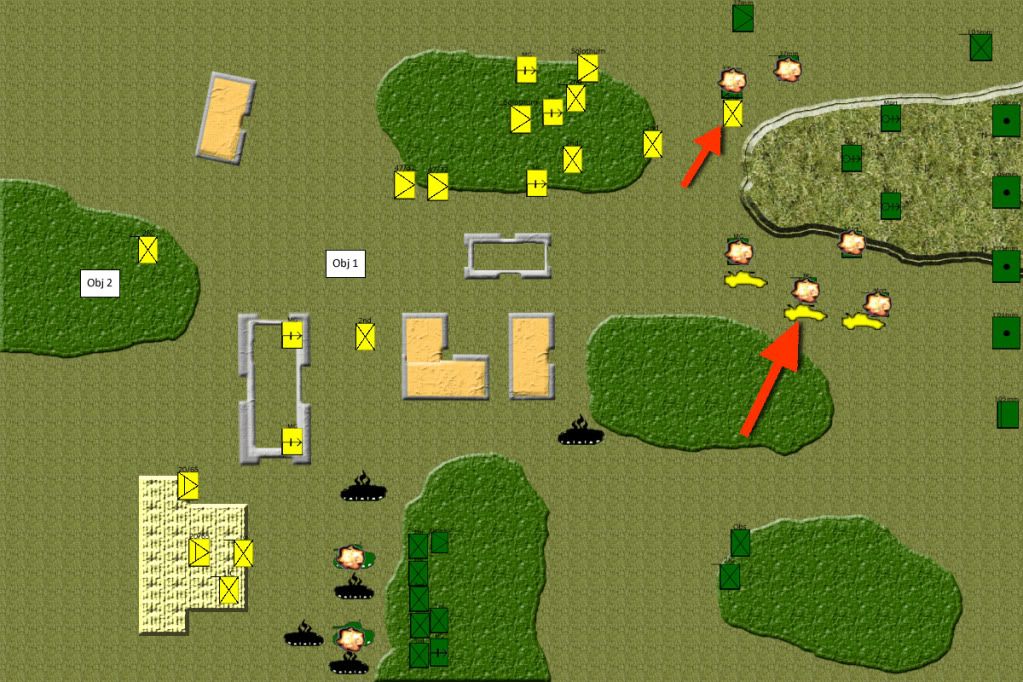
The first Italian reserves - a Carri platoon - arrived on the southern flank, moving up as far as they could. The bailed out Lancia jumped back in. Deprived of juicy Shermans to destroy, he opted to snipe an infantry team instead. Heavy machine gun and AT fire erupted all along the lines, causing some casualties in the center infantry blob, but not doing too much harm. It was time for the Big Push, and the US riflemen made ready for what was supposed to be the battle-winning assaults. The southern infantry exited the forest and moved to within striking distance of the Berzaglieri. The center blob moved up to assault the house containing a single Italian team, while the Shermans stood still to lend their fire to the assault. Artillery rained down on the lone Lancia and the southern Berzaglieri platoon, bailing the AT truck and pinning the infantry. The infantry fired all their shots killing nothing, and the tanks didn't fare better. Having no smoke concealing their movement, the southern US riflemen ran towards their adversary only to be countered by withering fire. Shattered, the assaulting platoon fell back to the woods. The forward platoon in the center assaulted the building but were also rejected by a hail of bullets, causing them to seek refuge further back, one team missing in action. Finally, it was down to the Shermans to show how it was done, and they assaulted the southern Berzaglieri, AT gun shells bouncing off their side armor. Three Italian infantry teams were destroyed, and the rest refused to counter attack, winning the assault for the Americans. A minor victory in what could have been a much better orchestrated assault.
Turn 4-5
 |
| Turn 4 |
Italian armored cars showed up in the center-North while the Carri to the South pushed up to support the beleagured infantry. The Lancia's crew once again manned their gun. Heavy machine guns and AT guns once again opened up, killing a couple of teams in the center while the Lancia destroyed another Sherman. The tanks - now outside the Lancia's field of fire - opted to stand and shoot at the Infantry and guns in front of them. The infantry in the center moved into new positions, while the 37mm AT guns in the North attempted to dig in, but found the ground too hard, breaking a few shovels in the process. The Shermans fired at the Carri, hitting three with penetrating shots but failing to destroy any of them. The remaning Lancia was finally dispatched with artillery and mortar fire. The northern Berzaglieri now started to advance together with the armored cars. A newly arrived mortar platoon took up positions to fire in the next turn while the Carri, joined by one of the three bailed out tanks, made a mad dash for the Shermans, getting two in position to fire at the weaker side armor of the American tanks. Machine guns, Solothurn AT rifles and 40/32 guns fired again at the center infantry, causing more casualties. The Southern platoon fired at the Shermans doing nothing, so it came down to the Carris to attempt to dispatch the US tanks. Three shots hit the Americans, two of them in the side, but none managed to penetrate the armor. The Carri were now standing right in the middle of some pissed off American tanks and within assault range of concealed Us Riflemen. It didn't look good for them.
 |
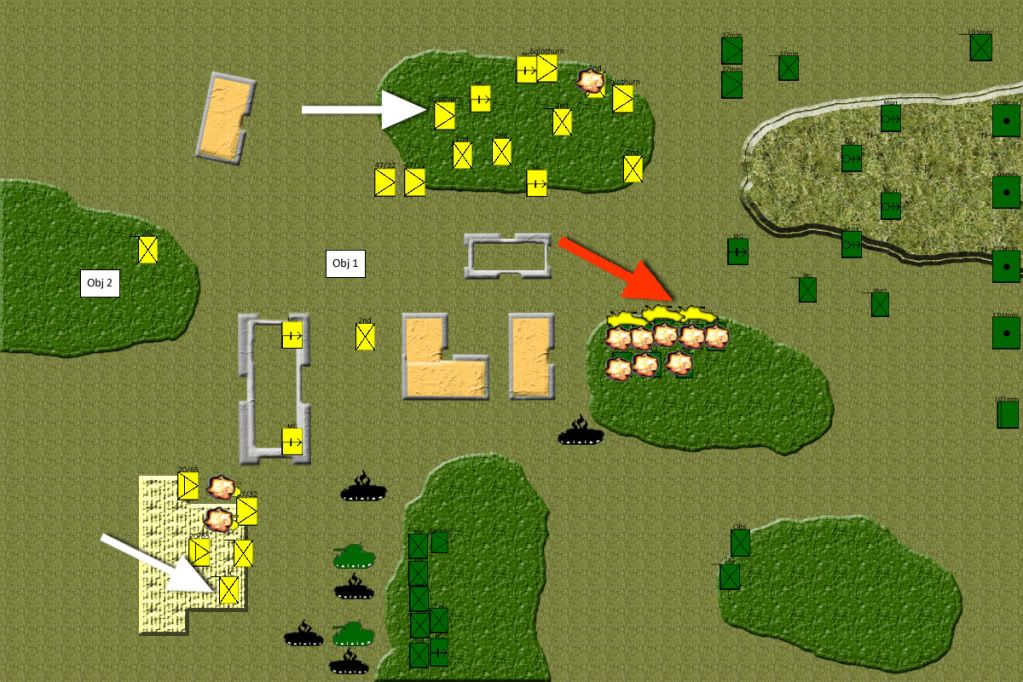
| Turn 5 |
The now heavily depleted front infantry platoon in the center decided that it was now or never and moved into position to assault the house containing the lone Italian infantry team. Meanwhile, the rearmost platoon moved northwards to assault into the forest containing advancing Italians. Smoke rained down in the center, concealing the movements of the Americans and ensuring that the defensive fire would be kept at a minimum. The Shermans easily dispatched the invading Carri, but the two remaining tanks - both bailed out - wouldn't go home. The infantry in the center assaulted the house but didn't manage to kill the Italians, who promptly counter assaulted with two teams, destroying one American. The Americans found courage for a counter assault of their own, killing one Italian team, and then began a few turns of neither side managing to hit, until finally the last Italian team was destroyed. Victorious, the American platoon suddenly decided they had had enough and retreated off the table. Way to go, boys! The northern infantry, concealed by smoke, failed to make contact in face of surprisingly heavy defensive fire. They retreated to the woods they started the game in, and leaving the US center practically empty.
Turn 6
 |
| Turn 6 |
The entire Italian force on the northern flank advanced towards the American back-lines, getting into position to fire at the 37mm AT guns and the lone HMG team in the HMG platoon. The armored cars got to within 10 cm of the infantry in the forest, loading their machine guns to decimate the Americans. A couple of 40/32 guns to the rear took up firing position on the Shermans, while the southern Berzaglieri platoon took aim. The Shermans, HMG and 37mm came out of the firestorm unscathed, but the center infantry took heavy losses. The Italian Armored cars followed up with a swift assault into the forest. Defensive fire caused one of the three cars to bail out, but the two others followed through, killing their targets. The Americans attempted to counter assault but couldn't harm the Italian cars. In the second round of assault, the Italians killed all but the HQ of the American platoon, who promply failed their moral and had to break off. The lone surviving HQ then decided enough was enough and ran off the table. In a break-through assault, the Italian armored cars then dispatched the American company HQ, leaving the weakened American force close to surrender.
The Shermans in the south bailed out another Carri, causing the platoon to finally pack it in. Artillery fell down but caused no damage anywhere, and the northern 37mm AT guns picked off an Italian team after having failed to dig in - again. The HMG platoon did manage to dig holes big enough to provide some cover, though.
Turn 7 and Italian turn 8
 |
| Turn 7 |
The Italian 40/32 AT guns decided to move a bit further to be able to hit the side armor of the Shermans. The armored cars followed up on their assault by moving through the forest, threatening to assault the HMG platoon in the next turn. The infantry in the northern woods moved up to the forest edge. Fire rained down on the Shermans, but they remained unscathed. Instead, they fired into the Italian guns, picking off an AT gun. The 37mm opted not to make a third attempt at digging in, instead wanting to fire at their full ROF at the Italians. That resulted in yet another Italian casualty, but nowhere near enough to break the platoon. Artillery failed miserably to stop the Italian armored cars, and the mortars braced themselves for a coming assault.
 |
| Italian Turn 8 |
In what was to be the final turn of the game, the Italians moved up to assault the 37mm AT guns in the flank. Lacking turn-tables, the US guns wouldn't be able to provide defensive fire in that direction. The armored cars manouvered to assault the HMG platoon and the rest stood still and fired. The two 40/32 AT guns found their mark, bailing another Sherman. Only the platoon commander remained operative, and he didn't like the odds one bit, running off the table with his tail tucked between his legs. The armored cars fired into the HMG platoon, killing nothing, and the mortar platoon, killing a mortar team, and followed it up with an assault that dispatched the tiny American HMG platoon, and killed the mortar commander. The northern Italian infantry shot the 37mm AT HQ dead and launched a 1-team assault on the two guns, killing one. The last American gun broke off, but refused to surrender. This concluded the game as the hobby center had closed an hour and a half earlier and we were getting evil glares from the manager.
The Result
As per the mission objectives, the game was an Italian victory, but as we had decided earlier, in event of a premature game ending due to the hobby center closing, we would call it a draw if neither of us had fullfilled our victory objectives. As I was over half the field but didn't claim the objectives, a draw it was, albeit a draw with a heavy tinge of Italian victory.
Thinking back on the game, I see a lot of mistakes that led to this conclusion of the game - mistakes mainly on my part. The first assault should have been covered by smoke. I was so afraid of the Lancias that I put far too much effort into destroying them, leaving my mortars unable to provide cover for the infantry, which was the job I had intended for them. I also failed to follow my original plan, which was to mass infantry on the southern flank, launching simultaneous assaults with all three platoons. As it were, after the first failed assault the southern platoon were basically just farting about in the forest, having no effect on the game at all. I should probably also have assaulted the southern Italians with my Shermans. That would be a risky undertaking, seeing as how I only needed to get a bailed tank to be forced to check for moral, but at least it would mean I had a chance to win the game. The Shermans didn't really do much at all as I used them, too afraid as I was of having them go and die on me. Finally, I need to learn to conserve my Company HQ. He has a nasty habit of dying in all my games, leaving me prone to lose the game on Company Moral. I didn't use his reroll once during the game, so he could just as well been in the back, out of harms way, or even in the southern platoon, maybe spurring them on to get unpinned (they spent a good three turns pinned). Overall, I'm learning and slowly getting better, but I still make too many mistakes, and I don't have the courage to follow through on my plans.
Anyway, thanks to Jonas for a fun game. Jonas really should have won the game, but I was literally saved by the bell. I promise I'll be better next time.
Cheerio!
Inga kommentarer:
Skicka en kommentar